
Read part two of this blog series.
Weather forecasting, testing and gear: Landscape time-lapse video requires movement to be interesting. That’s usually accomplished by motion control and (more importantly) dramatic moving light in the form of clouds and shadows. In the Bay Area that means winter is our window to shoot time-lapse of any weather besides fog. (As I demonstrated in my Day in the Life of a Fire Lookout video, fog can be a great subject but when you’re on top of a mountain and pointing the camera upwards it doesn’t help much.)
I began shooting for the West Peak project in late December and by early January I had learned a lot about what I need to do to get the shots I want. The West Peak area I’m working in is between 2450 and 2530 feet in elevation and when the cloud ceiling is just around that height the scene becomes very dramatic. The sight of the clouds rolling across the landscape and breaking to reveal the Marin headlands provides strong visual cues that we are on the top of a mountain. I use the NOAA weather forecasting tools, particularly the hourly weather graph and forecast discussion on their Mill Valley page. Click on the Forecast Discussion link at the bottom for detailed information about what the three major computer models are projecting.
The other essential weather tools I use are the Cloud Ceiling data on Wunderground’s Mill Valley page (look for both the Clouds field under Current Data and scroll all the way down to the bottom for the Aviation/Piloting column’s Ceiling field) and the amazing Fog Forecast on SF Gate’s weather page. I use the Accuweather forecast as another data point and finally there’s a webcam on top of Tam’s Middle Peak that I check in with many times per day to get visual confirmation of the forecast data in real time (scroll down a bit from the top of the page to the Mt. Tam Summit Cam).
Wind is a problem for the motion control gear because everything needs to be very stable except the motion provided by the motors and the weather or shadows. If the winds are gusting over 15mph I’m grounded. (I’m able to stabilize shaky shots in post to some extent and I’ll cover that in a future blogpost, but if it’s too windy I just go home.)
When working on a weather-dependant project you have no control over your schedule. In my case I waited until the wintertime because of the cloud potentials but this January and February turned out to be the least cloudy on record. I’ve had to be ready at a moment’s notice when the few clouds have come in. Although it’s been frustrating, I’ve been diligent when the opportunities have arisen. I know I’ll get what I need eventually, but it’s a big lesson in patience and trust. During weeks of continuous sunny weather I’ve had to keep myself busy with other projects (both personal and for clients). One of my favorite January diversions was a short video study of my barber. So when the weather gives you lemons, make a video about metaphorical lemonade!
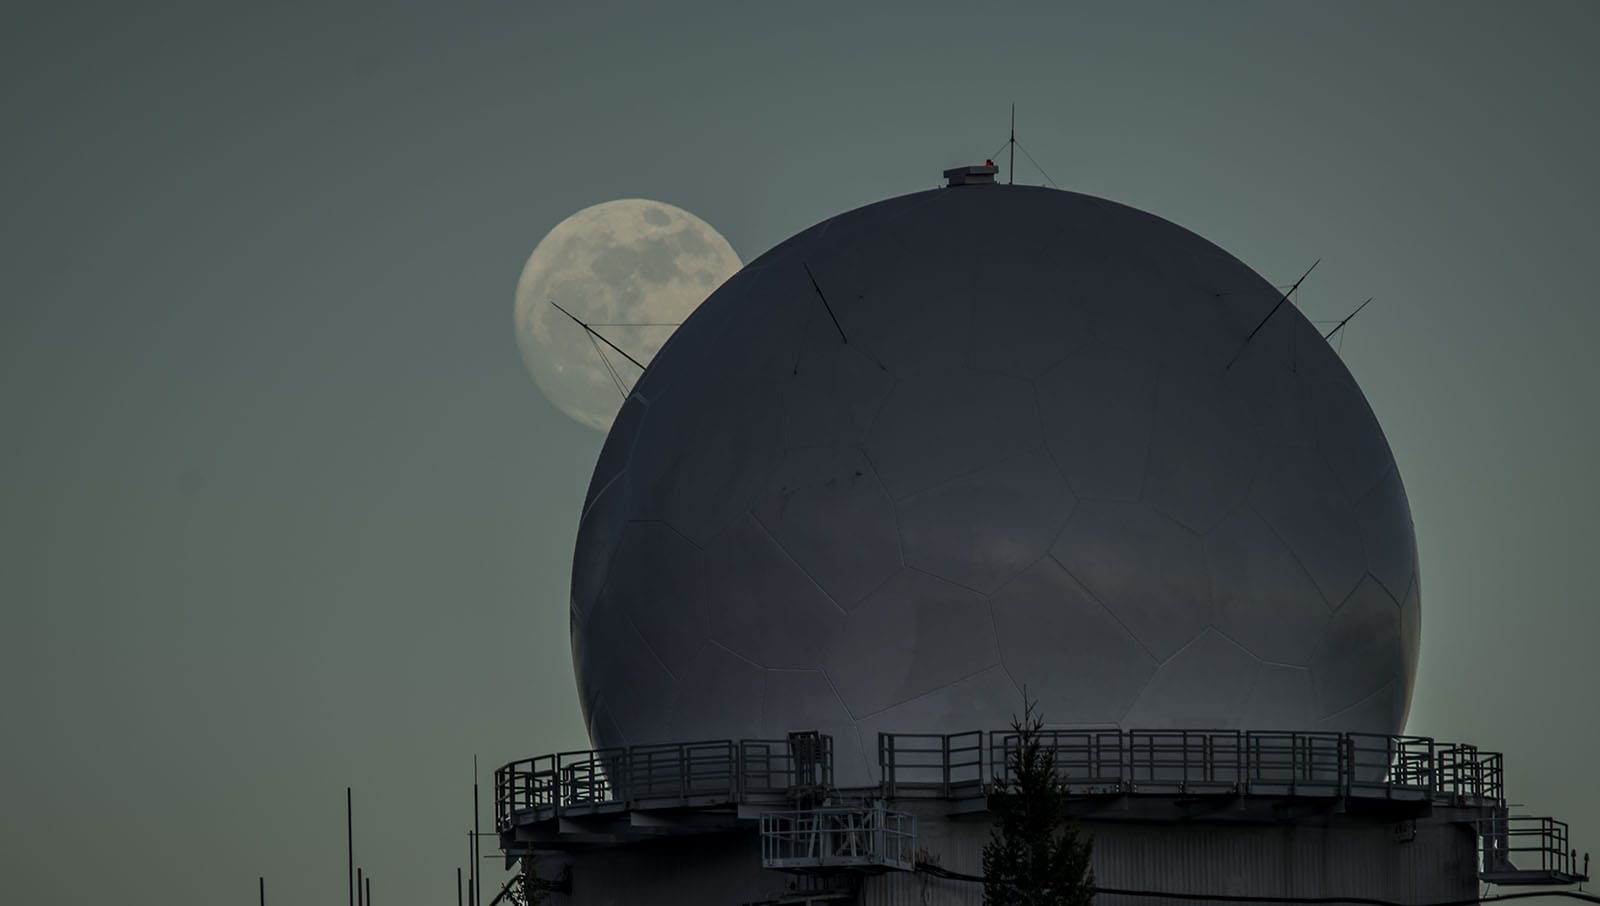
Before wrapping up about weather, it’s essential to mention one of the best tools ever invented for a landscape photographer: an iOS app call The Photographer’s Ephemerous. TPE can project the sun/moon rise/set location based on anywhere in the world, for any day. It’s inexpensive, and there’s also a free version that you can install on your laptop. Using that you can enlist the help of our solar system’s major astronomical bodies to create shots with great emotional impact. Here, for example, is a frame from a time-lapse sequence of the full moon rising behind the radome. The final shot is quite extraordinary.
Regarding camera motion, the simplest way do this with DSLR time-lapse is to shoot wider than your final shot and then (because your DSLR sensor is many times bigger than an HD frame) you can use LR Timelapse2 (described below) to animate an HD 1920×1080 crop window over the duration of the shot to simulate a motion-controlled camera pan. You won’t get the motion parallax effects that I mentioned in my last post, but it can be very effective. To create true motion-controlled shots I bring two complete time-lapse rigs and cameras with me up to the mountain for every shoot. Each shot takes 20–40 minutes to complete (remember, there are 30 frames in every second, and I’m creating 10- to 30-second-long shots each time so I have a lot of visual assets to choose from later).
Having two rigs means that while one shot is running I can be setting up another shot. This makes the most efficient use of my time and doubles the number of shots I can create. Rig #1 is based on a Nikon D4 with a 14-24mm f2.8 lens on the two-foot Kessler Crane motorized Pocket Dolly that worked so well for me on the Fire Lookout project. And Rig #2 is based on a Dynamic Perceptions six-foot Stage One slider and eMotimo TB3 multi-axis control head. This combination isn’t made to work together out of the box, but you can read about how to buy an additional stepper motor and get them linked up in this great post by Gunther Wegner (creator of LR Timelapse2). I use that rig with a Nikon D800 and a 16-35mm f4 lens because that combination is relatively light compared to the D4 rig, and the lighter weight and lower center of gravity translates into less wobble during sequence capture.
The RAW files on the D800 are over 40Mb each (D4’s RAW are about 23Mb each) and so a 20-second shot requires over 24Gb of storage. An eight-hour shoot of 12–15 shots consumes between 200–300Gb of storage—just in one day! Instead of buying a dozen very expensive 32Gb CF cards I use a Colorspace Hyperdrive with a 500Gb hard disk in it and just two 32Gb and two 16Gb cards. While one is in the camera the other one is being backed up to the Hyperdrive and I use them round-robin style—500Gb is more than enough for even my most ambitious day of shooting. Back in the studio I have matched sets of 2Tb G-Tech FW800 external drives that I use in pairs for primary and cloned backup storage. The Hyperdrive doesn’t get reformatted until I have two copies of every frame of each shot safely stored on the hard drives.
Once safely at home on mass storage, my workflow is to import all the hundreds of frames from a given shot into Adobe Lightroom 4 and simultaneously import them into my workhorse time-lapse editing software, LR Timelapse2. I’ll cover this in more depth in a later blog post because LRT2 is the enabling software technology behind this process—providing for keyframed control of all RAW file parameters over the duration of the shot. That means you can alter every parameter in Lightroom or Adobe Camera RAW as the shot’s exposure and lighting changes to bring out all of the detail that may be hidden within the frame, making creative decisions about color, depth, tone, and clarity throughout the shot. It’s what makes time-lapse sequences look so realistic, in fact almost hyper-realistic. After keyframing the RAW file parameters the videos are actually rendered in the slideshow module of Lightroom using video output templates provided by the developer of LR Timelapse2. You can output all the way up to 4k video, which is looking like it’ll be the next big thing in televisions of the future. (And as I mentioned earlier, the 7K-wide D800 frame provides outrageous flexibility for cropping within the frame, and by cropping a 400mm lens on the D800 you can produce HD video that is equivalent to what cold be shot with a 1200mm f5.6 lens. (Which, even if available, would cost over $10,000. Crazy!)
Rendering HD videos from RAW files in Lightroom takes quite awhile. Some of my most productive all-day shoots yield 12-15 shots (upwards of 5000 frames!) and take 18–36 hours to render all of the sequences. I only get to see what I’ve made after everything is rendered to quicktime .mov files and brought into Final Cut Pro X. It’s almost like the old days when we had to take our rolls of film home with us, develop them, let them dry and then print them the next day. Since there’s a very long time between creating a shot and actually seeing what it looks like in motion, it’s very important to make a lot of tests with the equipment beforehand. Thorough testing is the only way to know what you’re going to get in the field when you make changes to the various settings for the different motion channels over time. And then once in the field you need to take that knowledge and previsualize how the movement of the camera, the clouds and the sun are going to affect the final shot.
In the next post I’ll get into how neutral density filters are essential to getting proper results, and what makes a time-lapse image look silky smooth and what makes it look choppy.

